Tutorial 4: Build a zkApp UI in the Browser with React
zkApp programmability is not yet available on the Mina Mainnet. You can get started now by deploying zkApps to the Berkeley Testnet.
You're making excellent progress in your zkApp journey:
- In the Hello World tutorial, you built a basic zkApp smart contract with o1js.
- In Tutorial 3: Deploy to a Live Network, you used the
zk configcommand to create a deploy alias.
In this tutorial, you implement a browser UI using React.js that interacts with a smart contract.
Prerequisites
Make sure you have the latest version of the zkApp CLI installed:
$ npm install -g zkapp-cliEnsure your environment meets the Prerequisites for zkApp Developer Tutorials.
The Auro Wallet browser extension wallet that supports interactions with zkApps. See Install a Wallet and create a MINA account.
This tutorial has been tested with:
- Mina zkApp CLI version 0.11.2
- o1js version 0.12.1
- Auro Wallet version 2.2.3
Use the working application first
Before you go through the tutorial steps, take a look at a working zkApp UI example that has already been deployed to GitHub Pages.
- In a Chrome web browser with the Auro wallet extension, go to https://ymekuria.github.io/04-zkapp-browser-ui/index.html.
- When prompted, select Connect to let the website view your Auro wallet account.
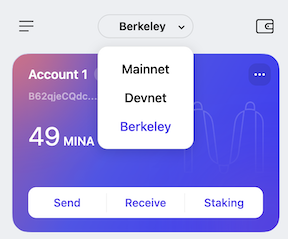
- In network dropdown menu in the wallet UI, select the Berkeley network:
- Select Get Latest State to view the state of the zkApp.
- Next, select Send Transaction.
- In your Auro Wallet, select Confirm to send the transaction.
High-Level Overview
In this tutorial, you create a new GitHub repository so you can deploy the UI to GitHub Pages.
You use example code and the zkApp CLI to build an application that:
- Loads a public key from an extension-based wallet.
- Checks if the public key has funds and if not, directs the user to the faucet.
- Connects to the example zkApp
Addsmart contract that is already deployed on Berkeley Testnet at a fixed address. - Implements a button that sends a transaction.
- Implements a button that requests the latest state of the smart contract.
- Deploys the zkApp to GitHub Pages.
Like previous tutorials, you use the provided example files so you can focus on the React implementation itself.
This example uses an RPC endpoint.
Create a project
You can have the zk project command scaffold the UI for your project.
Create or change to a directory where you have write privileges.
Create a project by using the
zk projectcommand:$ zk project 04-zkapp-browser-uiTo scaffold the UI for your project with the Next.js React framework, select
next:? Create an accompanying UI project too? …
❯ next
svelte
nuxt
empty
noneIf you are prompted to install the required Next packages, press y to proceed.
Select yes at the
? Do you want to set up your project for deployment to Github Pages? …prompt.If you are prompted to install the required Next packages, press y to proceed.
Select Yes at the
? Would you like to use TypeScript with this project?prompt.Select No at the
? Would you like to use ESLint with this project?prompt.Select No at the
? Would you like to use Tailwind CSS with this project?prompt.Your UI is created in the project directory:
/04-zkapp-browser-ui/uiwith two directories:contracts: The smart contract codeui: Where you write your UI code
The expected output is:
➜  source zk project 04-zkapp-browser-ui --ui next
✔ Do you want to set up your project for deployment to GitHub Pages? · yes
✔ Would you like to use TypeScript with this project? … No / Yes
✔ Would you like to use ESLint with this project? … No / Yes
✔ Would you like to use Tailwind CSS with this project? … No / Yes
Creating a new Next.js app in <yourfilepath>/04-zkapp-browser-ui/ui.

Using npm.

Initializing project with template: default
For this tutorial, you run commands from the root of the 04-zkapp-browser-ui/ui directory. You work in the ui/src/pages directory on TypeScript files that contain the UI code.
Each time you make updates, then build or deploy, the TypeScript code is compiled into JavaScript in the build directory.
Install the dependencies
When you ran the zk project command, your UI was created in the project directory: /04-zkapp-browser-ui/ui with two sub-directories:
contracts: The smart contract codeui: Where you write your UI code
Install the dependencies in each sub-directory.
In the
/04-zkapp-browser-ui/uidirectory, run:$ npm installIn the
/04-zkapp-browser-ui/contractsdirectory:$ npm install
Create a repository
To interact with a deployed zkApp UI on GitHub pages, you must create a GitHub repository.
Go ahead and create your repository now. For other projects, you can name your GitHub repository anything you want. For this tutorial, use 04-zkapp-browser-ui.
- Go to https://github.com/new.
- For the Repository name, enter
04-zkapp-browser-ui. - Optionally, add a description and a README.
Your project repository is ready to use.
Project structure
For all projects, you run zk commands from the root of your project directory.
For this tutorial, run the UI commands from the local /04-zkapp-browser-ui/ui/ directory.
Files that contain the UI code are in the /04-zkapp-browser-ui/ui/src/pages directory.
Preparing the project
Start by deleting the default index.page.tsx file that comes with a new project so that you have a clean project to work with.
In the
/04-zkapp-browser-ui/ui/src/pagesdirectory:$ rm index.page.tsx
Build the default contract
This tutorial uses the default contract Add that is always scaffolded with the zk project command.
To build the default contract to use in the UI, run this command from the /04-zkapp-browser-ui/contracts directory:
$ npm run build
The expected output is:
> 04-zkapp-browser-ui@0.1.0 build
> tsc
Outside of this tutorial, the workflow for building your own zkApp is to edit files in the contracts folder, rebuild the contract, and then access it from your UI.
Implement the UI
The React UI has several components: the React page itself and the code that uses o1js.
Download helper files
Because o1js code is computationally intensive, it's helpful to use web workers. A web worker handles requests from users to ensure the UI thread isn't blocked during long computations like compiling a smart contract or proving a transaction.
Download the helper files from the
examples/zkapps/04-zkapp-browser-uidirectory on GitHub:Move the files to your local
/04-zkapp-browser-ui/ui/src/pagesdirectory.Review each helper file to see how they work and how you can extend them for your own zkApp.
zkappWorker.tsis the web worker codezkappWorkerClient.tsis the code that is run from React to interact with the web worker
Download the main browser UI logic file
The example project has a completed app. The index.page.tsx file is the entry file for your application and contains the main logic for the browser UI that is ready to deploy to GitHub Pages.
Download the index.page.tsx example file.
Move the
index.page.tsxfile to your local/04-zkapp-browser-ui/ui/src/pagesdirectory.
Import and export statements
First, review the import and export statements:
- The
importstatements set up your React project with the required imports. - The
exportstatement creates a placeholder empty component.
  1 import { useEffect, useState } from 'react';
  2 import './reactCOIServiceWorker';
  3 import ZkappWorkerClient from './zkappWorkerClient';
  4 import { PublicKey, Field } from 'o1js';
  5 import GradientBG from '../components/GradientBG.js';
  6 import styles from '../styles/Home.module.css';
  7
  8 let transactionFee = 0.1;
  9
 10 export default function Home() {
 11   return <div/>
 12 }
Add state
This export statement creates mutable state that you can reference in the UI. The state updates as the application runs:
...
 10 export default function Home() {
 11   let [state, setState] = useState({
 12     zkappWorkerClient: null as null | ZkappWorkerClient,
 13     hasWallet: null as null | boolean,
 14     hasBeenSetup: false,
 15     accountExists: false,
 16     currentNum: null as null | Field,
 17     publicKey: null as null | PublicKey,
 18     zkappPublicKey: null as null | PublicKey,
 19     creatingTransaction: false,
 20   });
 21
 22   const [displayText, setDisplayText] = useState('');
 23   const [transactionlink, setTransactionLink] = useState('');
...
To learn more about useState Hooks, see Built-in React Hooks in the React API Reference documentation.
Add a function
This code adds a function to set up the application:
The Boolean
hasBeenSetupensures that the react featureuseEffectis run only once. To learn more aboutuseEffectHooks, see useEffect in the React API Reference documentation.This code also sets up your web worker client that interacts with the web worker running o1js code to ensure the computationally heavy o1js code doesn't block the UI thread.
...
 25   // -------------------------------------------------------
 26   // Do Setup
 27
 28   useEffect(() => {
 29      async function timeout(seconds: number): Promise<void> {
 30       return new Promise<void>((resolve) => {
 31         setTimeout(() => {
 32           resolve();
 33          }, seconds * 1000);
 34         });
 35       }
 36
 37    (async () => {
 38      if (!state.hasBeenSetup) {
 39        setDisplayText('Loading web worker...');
 40        console.log('Loading web worker...');
 41        const zkappWorkerClient = new ZkappWorkerClient();
 42        await timeout(5);
 43
 44        setDisplayText('Done loading web worker');
 45        console.log('Done loading web worker');
 46
 47        await zkappWorkerClient.setActiveInstanceToBerkeley();
 48
 49         // TODO
 50       }
 51     })();
 52   }, []);
 53
 54   // -------------------------------------------------------
...
Load the zkApp in the web worker
This code loads the contract and compiles it:
...
 47        await zkappWorkerClient.setActiveInstanceToBerkeley();
 48
 49         const mina = (window as any).mina;
 50
 51         if (mina == null) {
 52           setState({ ...state, hasWallet: false });
 53           return;
 54         }
 55
 56         const publicKeyBase58: string = (await mina.requestAccounts())[0];
 57         const publicKey = PublicKey.fromBase58(publicKeyBase58);
 58
 59         console.log('using key', publicKey.toBase58());
 60         setDisplayText(`Using key:${publicKey.toBase58()}`);
 61
 62         setDisplayText('Checking if fee payer account exists...');
 63         console.log('Checking if fee payer account exists...');
 64
 65         const res = await zkappWorkerClient.fetchAccount({
 66           publicKey: publicKey!,
 67         });
 68         const accountExists = res.error == null;
 69
 70         // TODO
 71  }
...
Create an instance
This code creates an instance of the contract at a fixed address and gets its current state:
...
 68         const accountExists = res.error == null;
 69
 70         await zkappWorkerClient.loadContract();
 71
 72         console.log('Compiling zkApp...');
 73         setDisplayText('Compiling zkApp...');
 74         await zkappWorkerClient.compileContract();
 75         console.log('zkApp compiled');
 76         setDisplayText('zkApp compiled...');
 77
 78         const zkappPublicKey = PublicKey.fromBase58(
 79           'B62qjshG3cddKthD6KjCzHZP4oJM2kGuC8qRHN3WZmKH5B74V9Uddwu'
 80         );
 81
 82         await zkappWorkerClient.initZkappInstance(zkappPublicKey);
 83
 84         console.log('Getting zkApp state...');
 85         setDisplayText('Getting zkApp state...');
 86         await zkappWorkerClient.fetchAccount({ publicKey: zkappPublicKey });
 87         const currentNum = await zkappWorkerClient.getNum();
 88         console.log(`Current number in zkApp state: ${currentNum.toString()}`);
 89         setDisplayText('');
 90
 91        // TODO
 92       }
...
Update the state of the React app
And finally, this function updates the state of the React app:
...
 89         setDisplayText('');
 90
 91         setState({
 92             ...state,
 93             zkappWorkerClient,
 94             hasWallet: true,
 95             hasBeenSetup: true,
 96             publicKey,
 97             zkappPublicKey,
 98             accountExists,
 99             currentNum
100          });
101        }
102      })();
103   }, []);
...
Run the React app
To run the React app, run commands from your local /04-zkapp-browser-ui/ui/ directory.
To start hosting your application at the
localhost:3000default location:$ npm run devThe zkApp UI in the web browser shows the current state of the zkApp and has buttons to send a transaction and get the latest state.
Your browser refreshes automatically when your page has changes.
If prompted, request funds from the Testnet Faucet to fund your fee payer account.
Follow the prompts to request tMINA. For this tutorial, your MINA address is populated on the Testnet Faucet. tMINA arrives at your address when the next block is produced (~3 minutes).
And in the second terminal window:
$ npm run ts-watchThis command shows TypeScript errors. As you develop your application, you can watch this window to check for type errors.
Write a new effect
Now that the UI setup is finished, a new effect waits for the account to exist if it didn't exist before.
If the account has been newly created, it must be funded from the faucet.
Later, you add a link in the UI to request funds for new accounts.
...
105   // -------------------------------------------------------
106   // Wait for account to exist, if it didn't
107
108   useEffect(() => {
109     (async () => {
110       if (state.hasBeenSetup && !state.accountExists) {
111         for (;;) {
112           setDisplayText('Checking if fee payer account exists...');
113           console.log('Checking if fee payer account exists...');
114           const res = await state.zkappWorkerClient!.fetchAccount({
115             publicKey: state.publicKey!,
116           });
117            const accountExists = res.error == null;
118            if (accountExists) {
119             break;
120           }
121           await new Promise((resolve) => setTimeout(resolve, 5000));
122         }
123          setState({ ...state, accountExists: true });
124        }
125     })();
126   }, [state.hasBeenSetup]);
127
128   // -------------------------------------------------------
...
Create functions for UI buttons
Functions can be triggered when a button is pressed by a user.
First, code for a function that sends a transaction:
...
128   // -------------------------------------------------------
129   // Send a transaction
130
131    const onSendTransaction = async () => {
132     setState({ ...state, creatingTransaction: true });
133
134     setDisplayText('Creating a transaction...');
135     console.log('Creating a transaction...');
136
137     await state.zkappWorkerClient!.fetchAccount({
138       publicKey: state.publicKey!,
139     });
140
141     await state.zkappWorkerClient!.createUpdateTransaction();
142
143     setDisplayText('Creating proof...');
144     console.log('Creating proof...');
145     await state.zkappWorkerClient!.proveUpdateTransaction();
146
147     setDisplayText('Requesting send transaction...');
148     const { hash } = await (window as any).mina.sendTransaction({
149     const transactionJSON = await state.zkappWorkerClient!.getTransactionJSON();
150
151     setDisplayText('Getting transaction JSON...');
152     console.log('Getting transaction JSON...');
153     const { hash } = await (window as any).mina.sendTransaction({
154       transaction: transactionJSON,
155       feePayer: {
156         fee: transactionFee,
157         memo: '',
158        },
159     });
160
161     const transactionLink = `https://berkeley.minaexplorer.com/transaction/${hash}`;
162     console.log(`View transaction at ${transactionLink}`);
163
164     setTransactionLink(transactionLink);
165     setDisplayText(transactionLink);
166
167     setState({ ...state, creatingTransaction: false });
168   };
169
170   // -------------------------------------------------------
And second, code for a function that gets the latest zkApp state:
...
170   // -------------------------------------------------------
171   // Refresh the current state
172
173   const onRefreshCurrentNum = async () => {
174     console.log('Getting zkApp state...');
175     setDisplayText('Getting zkApp state...');
176
177     await state.zkappWorkerClient!.fetchAccount({
178       publicKey: state.zkappPublicKey!,
179     });
180     const currentNum = await state.zkappWorkerClient!.getNum();
181     setState({ ...state, currentNum });
182     console.log(`Current number in zkApp state: ${currentNum.toString()}`);
183     setDisplayText('');
184   };
185
186   // -------------------------------------------------------...
Update placeholder
Replace the <div/> placeholder with a UI to show the user the state of your application:
...
186   // -------------------------------------------------------
187   // Create UI elements
188
189   let hasWallet;
190   if (state.hasWallet != null && !state.hasWallet) {
191     const auroLink = 'https://www.aurowallet.com/';
192     const auroLinkElem = (
193       <a href={auroLink} target="_blank" rel="noreferrer">
194           [Link]{' '}
195         </a>
196     );
197     hasWallet = (
198       <div>
199         Could not find a wallet. Install Auro wallet here: {auroLinkElem}
200       </div>
201     );
202   }
203
204   const stepDisplay = transactionlink ? (    );
205     <a href={displayText} target="_blank" rel="noreferrer">
206       View transaction
207     </a>
208   ) : (
209     displayText
210   );
211
212   let setup = (
213       <div
214        className={styles.start}
215        style={{ fontWeight: 'bold', fontSize: '1.5rem', paddingBottom: '5rem' }}
216     >
217       {stepDisplay}
218       {hasWallet}
219     </div>
220   );
221
222   let accountDoesNotExist;
223     if (state.hasBeenSetup && !state.accountExists) {
224     const faucetLink =
225       'https://faucet.minaprotocol.com/?address=' + state.publicKey!.toBase58();
226     accountDoesNotExist = (
227       <div>
228         Account does not exist. Please visit the faucet to fund this account
229         <a href={faucetLink} target="_blank" rel="noreferrer">
230           [Link]{' '}
231         </a>
232       </div>
233     );
234   }
235
236   let mainContent;
237   if (state.hasBeenSetup && state.accountExists) {
238     mainContent = (
239       <div style={{ justifyContent: 'center', alignItems: 'center' }}>
240         <div className={styles.center} style={{ padding: 0 }}>
241           Current Number in zkApp: {state.currentNum!.toString()}{' '}
242         </div>
243         <button
244           className={styles.card}
245           onClick={onSendTransaction}
246           disabled={state.creatingTransaction}
247         >
248          Send Transaction
249         </button>
250         <button className={styles.card} onClick={onRefreshCurrentNum}>
251           Get Latest State
252         </button>
253       </div>
254     );
255   }
256
257   return (
258     <GradientBG>
259       <div className={styles.main} style={{ padding: 0 }}>
260         <div className={styles.center} style={{ padding: 0 }}>
261           {setup}
262           {accountDoesNotExist}
263           {mainContent}
264         </div>
265       </div>
266     </GradientBG>
267   );
268 }
The UI has three sections:
setuplets the user know when the zkApp has finished loading.accountDoesNotExistgives the user a link to the faucet if their account hasn't been funded.mainContentshows the current state of the zkApp and buttons to interact with it.The buttons allow the user to create a transaction and refresh the current state of the application by triggering the
onSendTransaction()andonRefreshCurrentNum()functions shown in the code.
That's it for the code review.
If you've been using npm run dev, you can now interact with the application on localhost:3000. The application has all of the functionality that is implemented in this tutorial.
Deploying the UI to GitHub Pages
Before you can deploy your project to GitHub Pages, you must push it to a new GitHub repository.
- The GitHub repo must have the same name as the project name.
- In this tutorial, the project name is
04-zkapp-browser-ui. - The
zk projectcommand created the correct project name strings for04-zkapp-browser-uiin thenext.config.jsandsrc/pages/reactCOIServiceWorker.tsfiles.
To deploy the UI:
Change to the local
/04-zkapp-browser-ui/ui/directory.Run the deploy command:
npm run deploy
The scripts defined in the /04-zkapp-browser-ui/ui/package.json file do the work to build your application and upload it to GitHub.
After the processing is complete, your deployed zkApp is available at:
https://<username>.github.io/04-zkapp-browser-ui/
where <username> is your GitHub username.
Conclusion
Congratulations! You built a React UI for your zkApp. The UI allows users to interact with your smart contract and send transactions to Berkeley Testnet.
You can build a UI for your application using any UI framework, not just React. The zkApp CLI also supports SvelteKit and NuxtJS projects.
You are ready to continue with Tutorial 5: Common Types and Functions to learn about different o1js types you can use in your application.